Showing posts with label home projects. Show all posts

Tuesday, June 26, 2012

the new baby nest

Little Kids' Room

I just completed a mini redo of the little kids' room that will soon house not just Cooper, but the new baby once he or she arrives.


This is what it looked like before:

Little Kids' Room- before

A bit boring, but not horrible. I didn't want to do anything too crazy, but I was really sick of the brown bumper and needed to figure out bedding for Cooper's toddler bed too. The paint, furniture, rug, and artwork still worked though.

Little Kids' Room

First I sewed up a crib bumper for the baby that features Cloud9's Happy Nursery leaves on one side, and appliqued leaves on linen on the other.

Little Kids' Room
Little Kids' Room

I won't lie-- that bumper took forever. The cutting and stitching almost drove me mad. But I love it.

Little Kids' Room

I had planned to replace the crib skirt and changing pad cover, but decided that they'll still work! I still might change up the bunting. Who knows.

Little Kids' Room

Cooper got a down comforter and new duvet cover that I made out of a twin size duvet from IKEA. And he actually sleeps under it! Score.

Little Kids' Room
Little Kids' Room

Honestly, I don't have a whole lot to do now to get ready. I need to sew up a couple of nursing covers (one for me, one for a friend who is due next week) and maybe do a blanket. I'd say I need to make this baby a quilt, but that's been taken care of by an amazing bunch of friends out there. Some of you reading this know all about it, but I can't wait to share more on it soon. I think I can stop crying (happy tears) about it long enough to take some photos and write up a deserving post.

Monday, April 16, 2012

Modern Patchwork Magazine

Modern Patchwork Magazine

I'm feeling a bit stunted in the creativity department lately. Lots of cleaning and purging and list making is happening right now, but no sewing. Hopefully I'll feel like getting back into it this week? In the meantime, just a quick note to mention that I have a project in Interweave's magazine Modern Patchwork.

personalized place mats

Personalized Placemats are something we've utilized in our house for a couple of years now and they make setting the table really easy for the kids. It was fun to make another set to add to our rotation.

Sunday, September 11, 2011

it all started with the ironing board (a sewing room redo)


Let me start off this post by saying that I feel so incredibly lucky to have my own sewing room. When we remodeled our basement and included it in the plans, I couldn't believe it! Having my own space where I can go make a big mess, then shut the door and know that the dogs won't eat things and kids won't step on pins has made me so much more productive. This was the space, in a corner of an open family room, before we remodeled: 

I love that blue, but what a mess!
And this was the space after:

 
neat and organized, but not as functional as I thought

When I picked the buttercream yellow paint for the room originally, I really don't know what I was thinking. The room doesn't have a window, so maybe I was hoping it would bring a sense of sunshine? Well, I never liked it. Everything clashed with it. Including my new ironing board cover from Target (at the beginning of this post) that Jenny told me me about after I fixed up the girls' bathroom. I had to have it, but it looked horrible in the room.

I started dreaming about new paint. And ways to keep Cooper from clearing off my bookshelves/dumping out boxes of snaps/etc. I made measurements and imagined all sorts of new layouts.

So last week I got to work. When Rob left for an overnight backbacking trip, I took advantage and made a trip of my own to Lowe's for a gallon of creamy vanilla paint, shelving, and two sets of coat hooks. In one 3-hour naptime (woo hoo!) I managed to move everything out of the room and do two coats of paint. That night I was able to install the shelving and start moving everything back in. By the time Rob arrived home the next afternoon, the room was finished. He inspected my work for safety's sake, and I was sewing again the next day.

It doesn't look this dingy in real life (remember, no windows!):


It's nothing fancy, but I love how it turned out. The best part of the room is that it's so much more functional. There is a ton more floor space, so Cooper or the girls can be in there playing (the other day Avery and Claire spread out and scrapbooked for hours) and I still have plenty of room to work. Eventually I'd like to make some floor pillows to make things cozy and a big detachable design wall for the wall next to my desk. But for now, it's just right.

Friday, July 29, 2011

a pair of pillows

With all of the back-to-school sewing going on here (Claire wants a messenger bag for school now too), I decided to shelve my original cushion plan that used bunches of quarter square triangles and went the quick route instead. Enter the Echino cheater print:


The construction is super simple. Each pillow consists of an 18" square of the Echino and two 14" x 18" pieces of what has become my favorite fabric (from Jo Ann's of all places!), hemmed and overlapped to make an envelope back, and an 18" pillow form. I sewed them with a 1/4 inch seam allowance and zig zagged the raw edges to prevent fraying. Super easy! It took about 20 minutes per pillow.


Ah, much better. Rob cringed when he saw them (do all men hate pillows on the couch?) but Avery and Claire snuggled up with them right away.


Also, I decided to tweak my blog design this morning without much planning. Please let me know if anything looks weird!

Saturday, July 2, 2011

chiseled

I wish this post was about my abs, but it is not. My midsection instead resembles the squishiness of this:


I made my first pillow today with the 
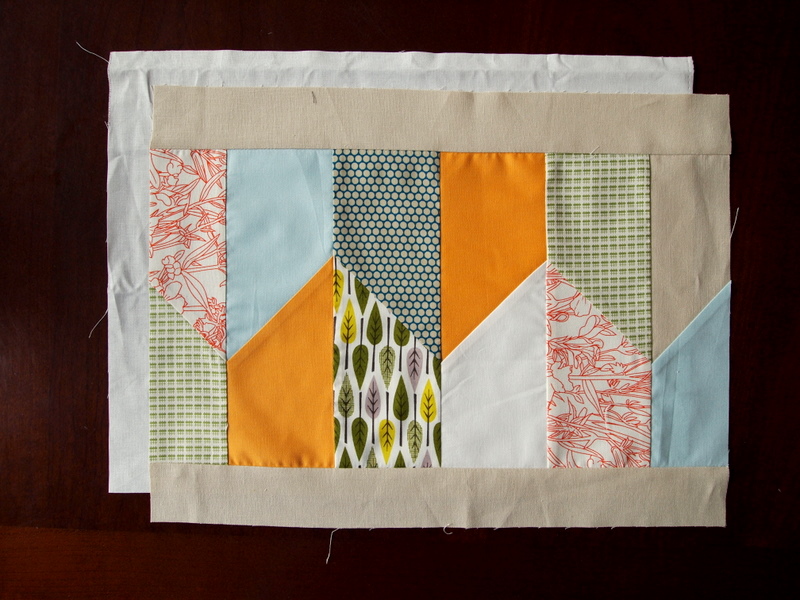
chisel die that I received with my AccuQuilt GO! Baby! I'll admit that my math is rusty though. I had the design all mapped out, then had to improvise in the middle of the process because I thought that the two chisels when sewn together were 12.5 inches tall, not 9.5 inches. Oh well, I added a couple of borders. I'll have another tutorial up later this week on the pillow I'm making from the quarter square die!

Chiseled Pillow Tutorial

Materials:


6 different fabrics, cut into 4" x 12" rectangles (You'll see I have 8 in my photo. Whoops! There was the math issue. You can use 8 fabrics like I did to get more variety, but you'll have 4 spare chisels to use in a different project.)
(2) 2" x 16.5" strips of solid fabric
(2) 12.5" squares of backing fabric
(1) 12.5" x 16.5" rectangle of muslin
12" x 16" pillow form
AccuQuilt GO! Baby and Chisel Die

Instructions:

1. Place three rectangles of fabric, stacked on top of one another, on the chisel die. Make sure to line up the fabric so that it covers the blades completely and that the grain is straight (the blades are set at an angle on the die for easier cutting).


2. Place the cutting mat on top, and roll on through the GO! Baby!


3. Repeat steps 1 and 2 with the other 3 fabrics. (See note 3 at the bottom of this post if you're using all prints for your fabrics. If so, you'll need to lay your second set of fabrics right side down.)

4. You'll have 12 perfect chisel shapes and very little waste!


5. Arrange chisels in your preferred layout and sew together. Sew them up in pairs first (one each from the top and bottom row), then stitch the six pairs together. Trim 1" off of each side so that the panel of chisels measures 9.5" by 16.5".


6. Sew the solid strips to the top and bottom of the pieced chisels to complete the top.


7. On each piece of backing fabric, fold one edge over 1/2 inch and press. Fold over again 1/2 inch and topstitch to create a finished edge.

8. Layer the pieces for final construction in this order: muslin, pillow top (right side up), and overlapping backing pieces (right side down). Pin layers together.

9. Sew around perimeter using a 3/8" seam allowance. Turn right side out, and stuff with your pillow form!


I've mentioned before that my family does not appreciate pillows on our couches. Cooper is already showing his disdain.


I expect it to get munched up by the dogs within a week or two.

Some notes about the above project:

1. It took me less then 5 minutes to cut all of the fabric into their rough rectangles, then less than 5 minutes to run them through the GO! Baby. Definitely a timesaver.

2. The notches in the dies make it super easy to line up the chisels for sewing. It makes piecing much more accurate than if I tried to sew up chisel shapes cut with a rotary tool.

3. One thing that I didn't get when I was first cutting is that the chisels all come out of the die exactly the same. I thought that I would get two chisels that were a mirror image of one another. Of course I looked at the instructions on the die afterwards, and they make that clear. Another whoops for me. It was okay because half of my fabrics were solids, so I could flip them over to make the design work. But if you're using all prints, you need to place half of your fabrics right side down on the dies, and half of them right side up to get six chisels of each orientation. That's the way to make the zig zag setup that I have in my pillow.

Let me know if you have any questions!

Monday, June 13, 2011

mulling it over

I've got the busiest week ever coming up. Yet I have decided that I MUST finish the quilt that is destined for the big orange wall. The block pattern is "Kathy's Block" from Gwen Marston's book Liberated Quiltmaking II. All but a couple were made by members of the Bee Liberated group of Flickr. I'm expecting two more blocks that are winging their way in from the Bahamas any day now, then I'll be making the rest. That is, when I decide how big to make this baby. I need your help!


My original thought was to make the quilt a 5 x 5 square. Now that it's up on the wall, I'm not so sure that's the right choice. Thoughts? Do I go 4 x6? 5 x 6? This is one of those times where I wish I had photoshop so I could do a mock up.


I'll also take suggestions on how to quilt it. Oh, and any other way to spice up my boring living room. I may have to cave and do some throw pillows for the couches. I think the quilt is a good start though!

Saturday, February 5, 2011

the after

Ta-da!

I finished the painting (save a teeny bit of high work due to a broken extension pole attachment) on Wednesday night but didn't have the energy to post about it.

The after:


I'll be honest-- while I like the green, the orange is giving me fits. I need to mellow out that big expanse of wall over the couch (and that darn speaker), but I'm not sure what to put on it? I started pulling random artwork from around the house then got discouraged. I'm thinking it needs something lighter in color to tie in the green. It's just so hard to find something that I like that doesn't cost the big bucks. Maybe I'll quilt something? Any suggestions are welcome, because home decorating is not exactly my thing.

Monday, January 31, 2011

this week's crafting...

... might be put on the back burner. I have felt the need to repaint our main living area and hallways for awhile now, and decided this morning that the priming just had to happen during naptime. Of course naptime is now over and I'm not all the way finished, but it's getting there.

My husband painted the dark red wall before we met, and the "Home Depot Orange" hallway within the first month that we were dating (before I knew I'd be living in this house). As much as I love color and pretty much all of the other color choices he's made in our home, these two had to go. The before:

The during (the orange went all the way down that hallway):


As much as I liked the idea of going neutral, we have too much cold and blah outside most of the year and really prefer color. We're trading the orange for a nice neutral green (Martha Stewart's Parchment Paper) and the red for a softer burnt orange (Martha Stewart's Yam):

Wish me luck! Hopefully there will be some good "after" photos later this week.