

It's time to sew the Zip Organizer by Masko Jefferson!

I'll admit it-- when I found out I was assigned to review the Zip Organizer (which I had selected as a project I really wanted to do, by the way), I kind of panicked. I'm not really the best with patterns in general. I had never done a wrap around zipper or successfully bound anything with bias tape. Couple that with some pretty lengthy instructions and I was scared. But I really didn't need to be! Sure there are a lot of pieces to cut and a lot of steps to follow, but they are totally doable. By my third organizer, I didn't even need to look at the instructions. And because I made three different versions to test out interfacing and different methods of construction, you can learn from the mistakes I made.
IMPORTANT-- make sure to read the Zakka Style errata before you start making your organizer! There are important changes that you need to note before you cut your fabrics. There is also an additional change regarding cutting interfacing-- where it says to cut (2) 11 x 18" pieces of interfacing, change that to (2) 11 x 8" pieces.
And one more thing-- I know that this is an intimidating pattern, in part because some of the trickiest steps along the way are hard to illustrate in a book format where there is limited space for each project. Masko is an amazing designer and writes amazing patterns. She was so great to talk to as I was going through this process. So if you were just following the book you'd figure it all out just fine. But I thought it would be great to have the opportunity to share tips those tips here that there just wasn't space for in the book.
The organizers:
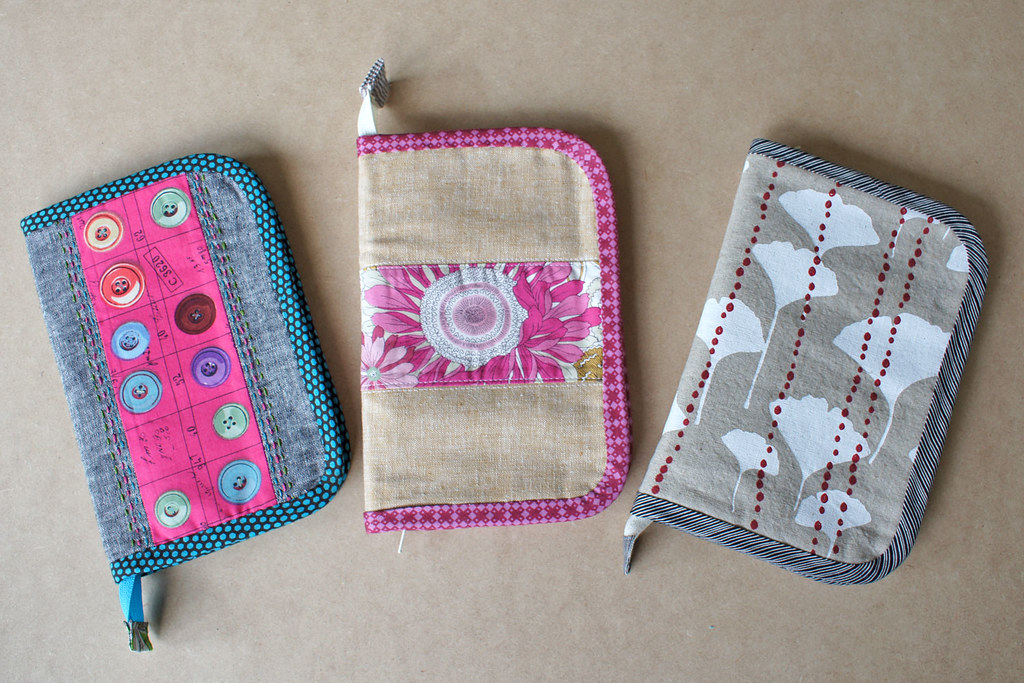
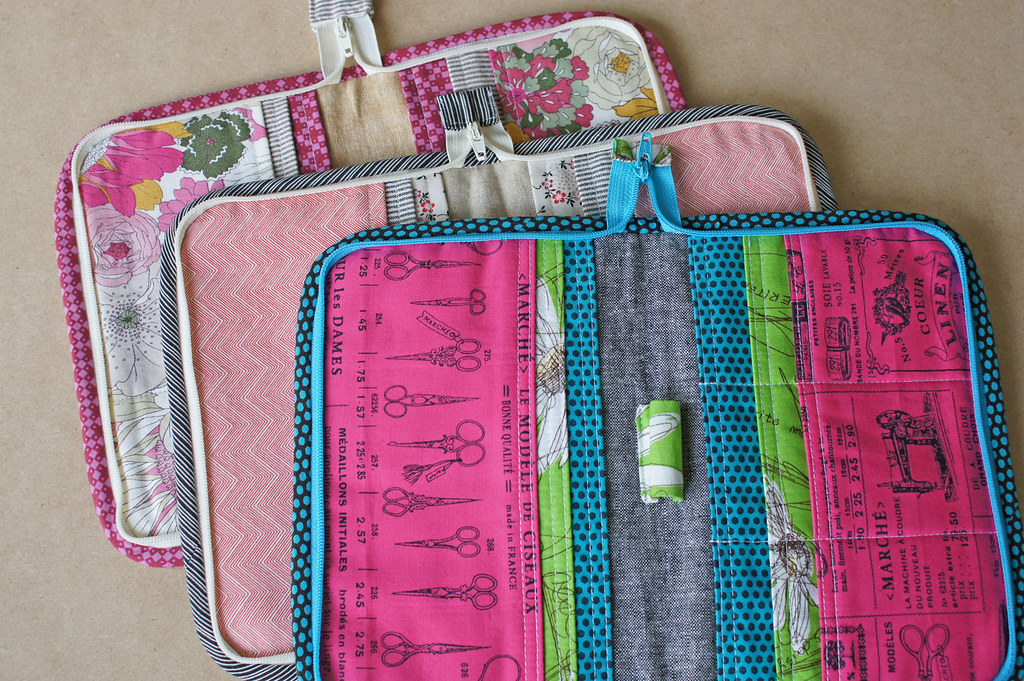
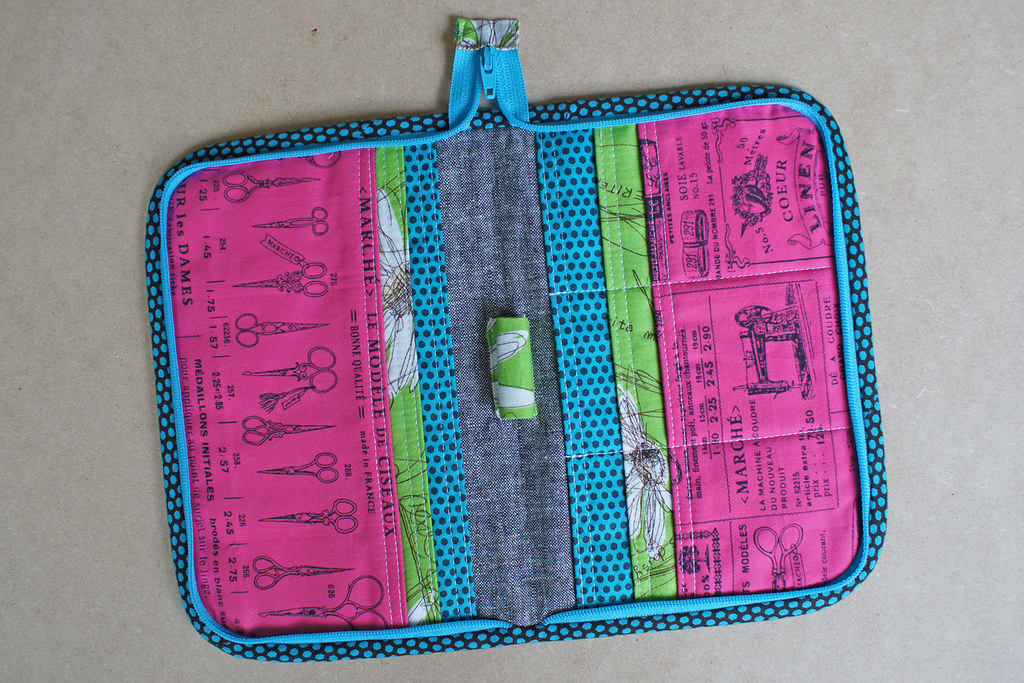
Version 1: Materials include some gorgeous Essex yarn dye linen in "Leather" by Robert Kaufman, a Sevenberry floral, Lecien yarn dye stripe, and a bit of Hope Valley.

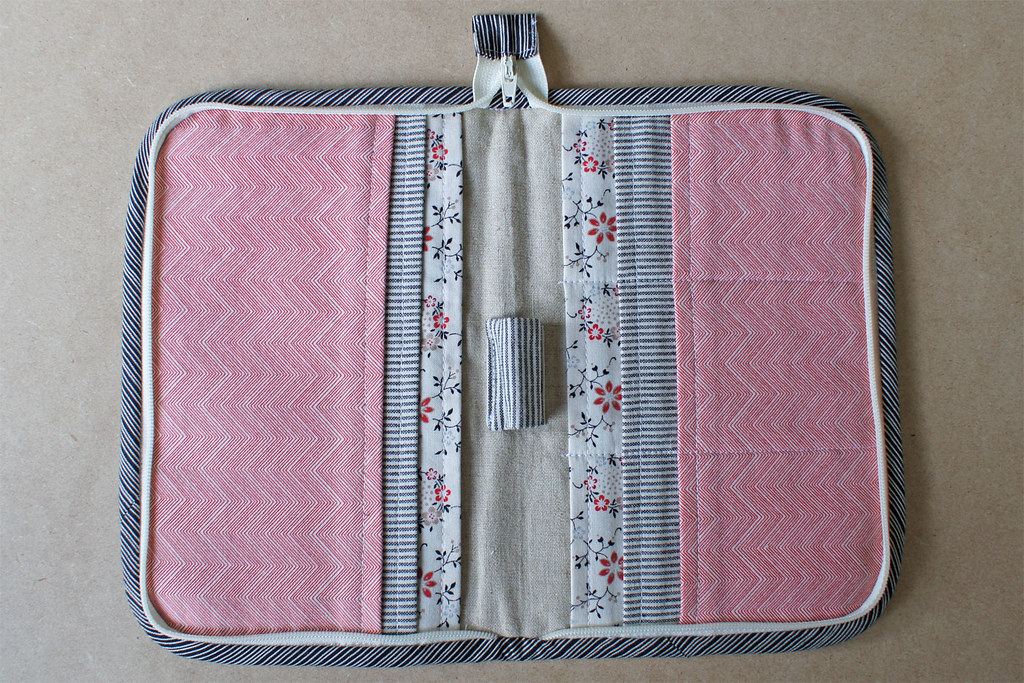
Version 2: Materials include a hoarded Gingko screen print by Ink and Spindle, a Lecien yarn dye stripe and floral, and Sweetwater's Authentic stripe.
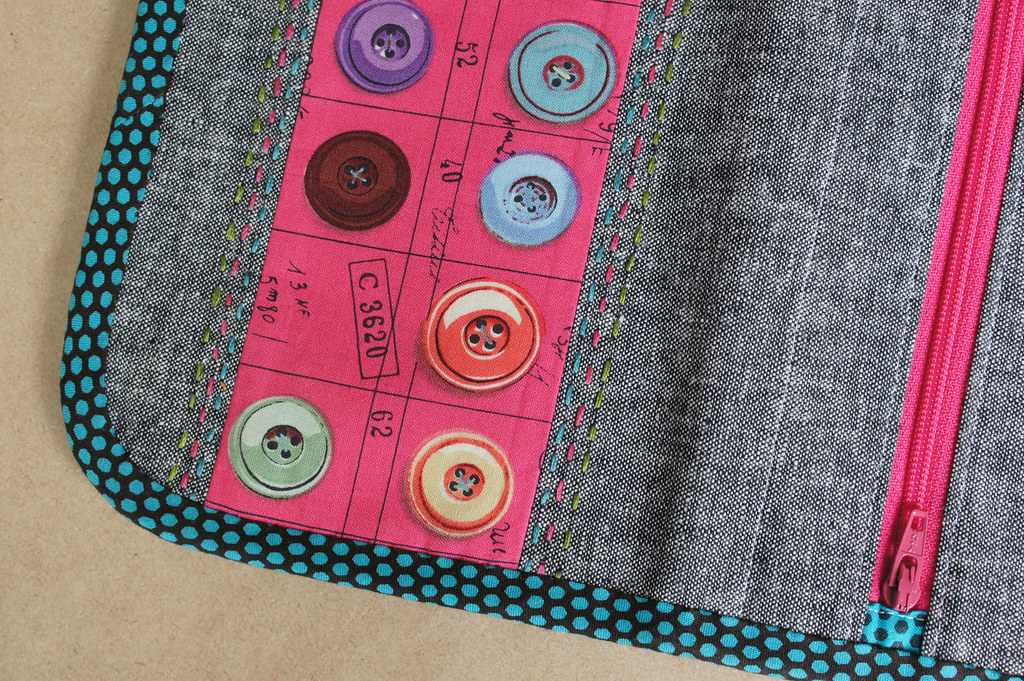
Version 3: Materials include another gorgeous Essex yarn dye linen in "Black" and various Suzuko Koseki prints. I did some handstitching on the front with Cosmo floss-- so yummy!
Interfacing suggestions:
For version 1, I used Pellon SF101 woven fusible interfacing exclusively. While it worked great overall, I wanted the organizer to be a little more structured.
So for version 2, I thought I'd try using fusible fleece interfacing on the outside piece and used the Pellon 101 for the rest. While the fusible fleece didn't cause issues with bulkiness along the edges like I feared, it gives the organizer a sort of puffy appearance that I'm not fond of.
Finally, version 3! I found some Pellon Craft Fuse 808 in my stash. It was just right-- it gives a good amount of structure without bulk, and the cover looks crisp. I continued to use Pellon 101 for the rest of the pieces.
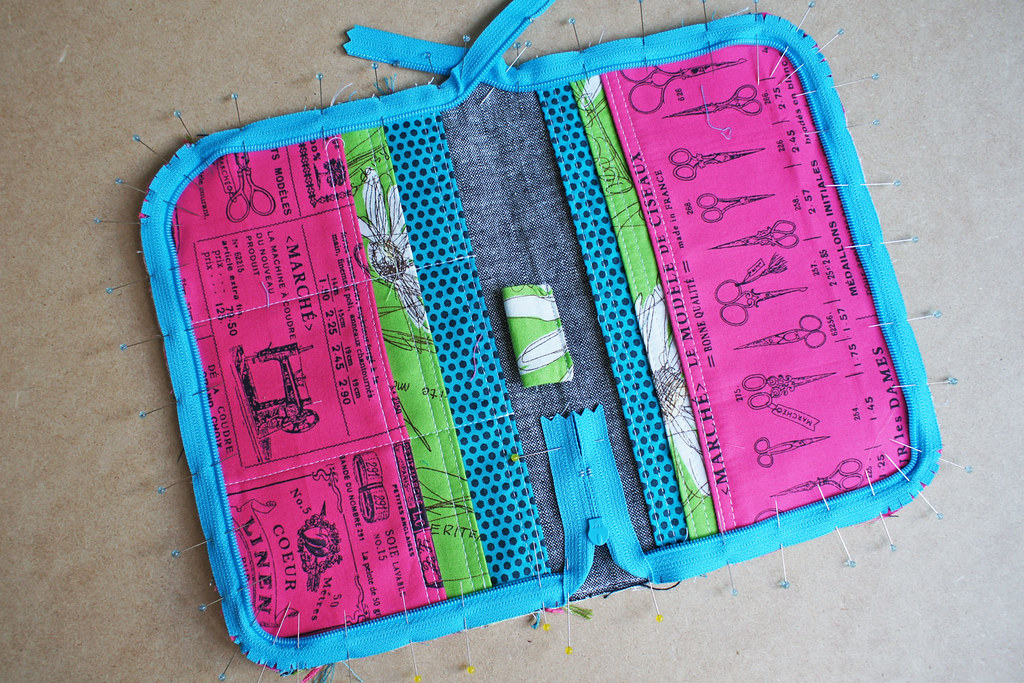
Sewing on the outer zipper:
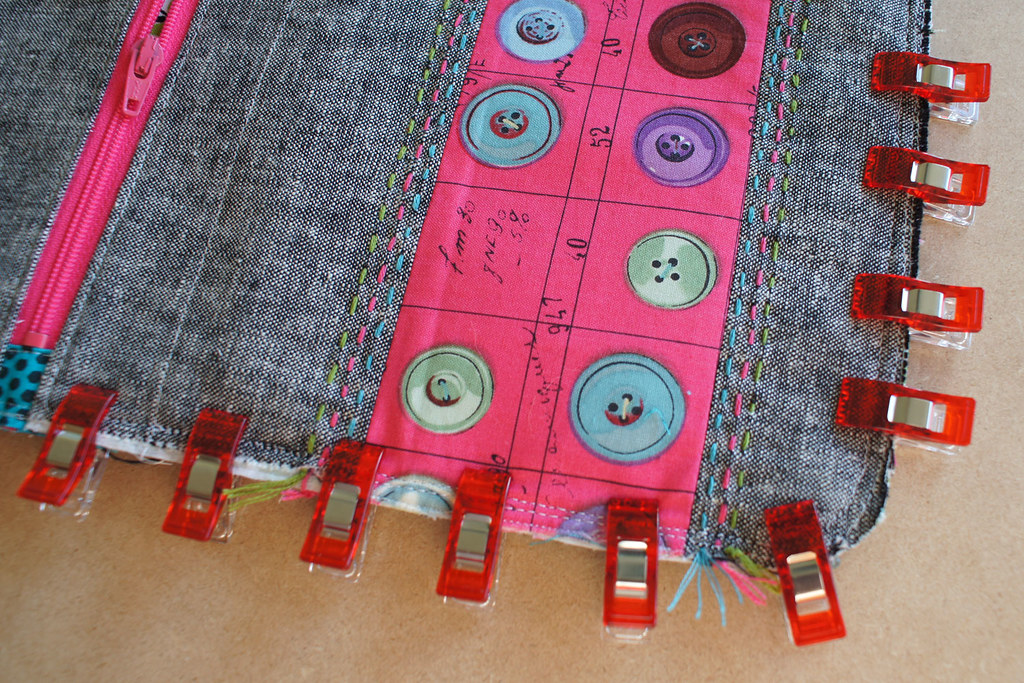
At first I was confused about how to sew the zipper along the outer edges so that the closed zipper end wouldn't be interrupted by the binding. Here you can see what the zipper looks like when you pin it around the outside-- note that the closed end is folded inward and pinned.
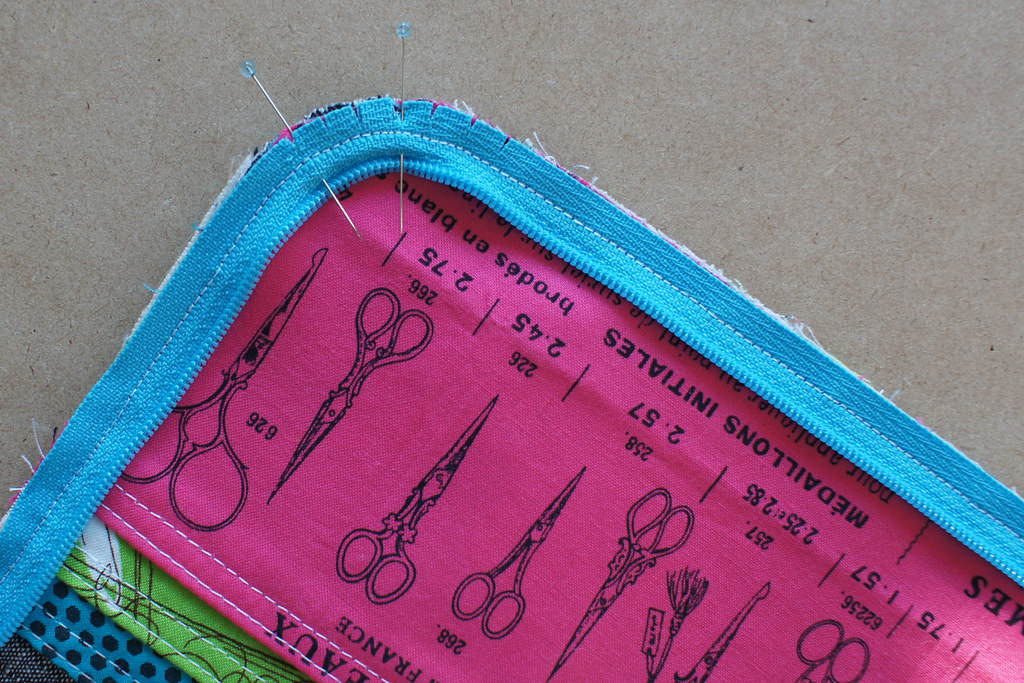
After you sew it on, leave the pins that hold down the zipper teeth in the corners. You'll want these to be out of the way when you stitch on your binding. Otherwise they can get caught and you'll have to redo the corners. Trust me.
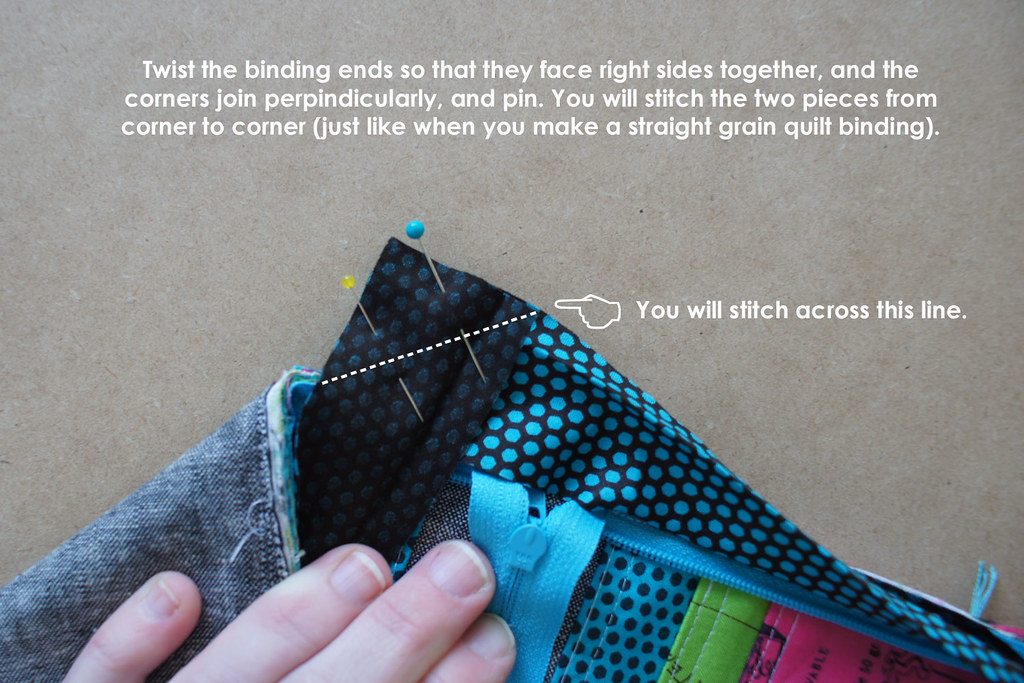
Joining together your bias binding edges:
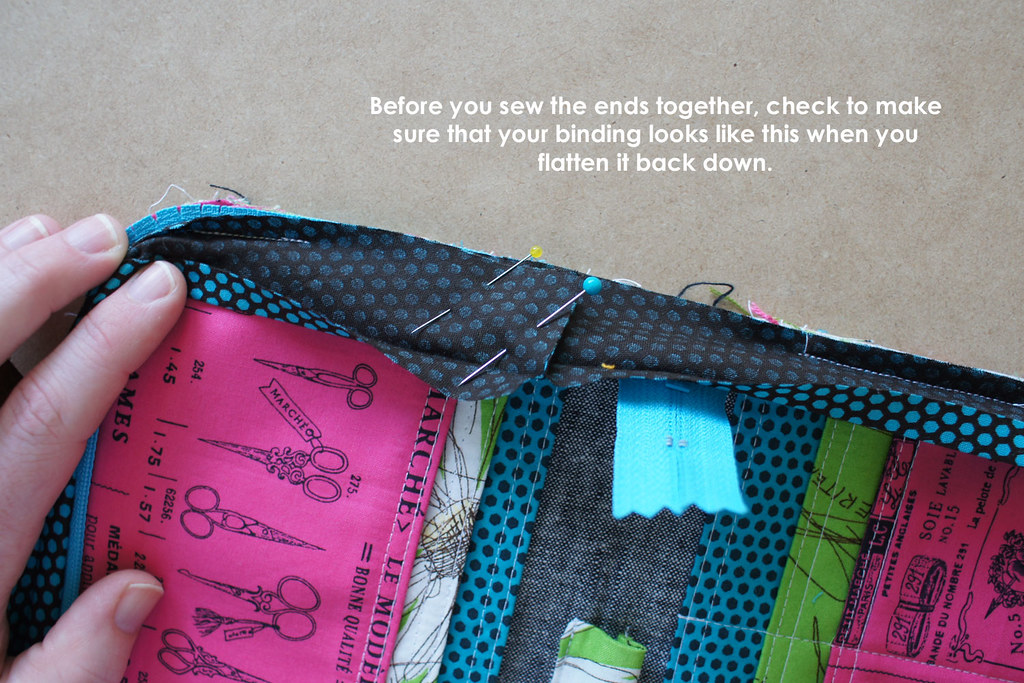
The book covers how to make a bias binding, but doesn't explain how to join your binding edges together so they go continuously around the organizer. You can always fold over one of the ends and overlap it on top of the other-- but to reduce bulk and make things look nicer, take these steps to do a mitered join.


If this is confusing, which it very well could be, you can check out this blog post for more detailed steps.
Do as I say, not as I did:
1. You will have a lot of layers to sew together as you go along-- they will shift if you don't secure them before you sew! Use lots of pins, or my new favorite, Wonder Clips.
2. If you decide to piece together your outer cover, be conscious of lining things up when you sew on the back zipper. I don't like pinning when I sew on a zipper, but obviously that didn't work out so well for me here. Take your time and make sure things line up.
3. Consider using a glue , like Roxanne Glue Baste It, to attach your bias binding around the front before you hand stitch it. It makes a huge difference! I even used it to secure the fabric tab to my zipper end before sewing it on.
Finishing touches:
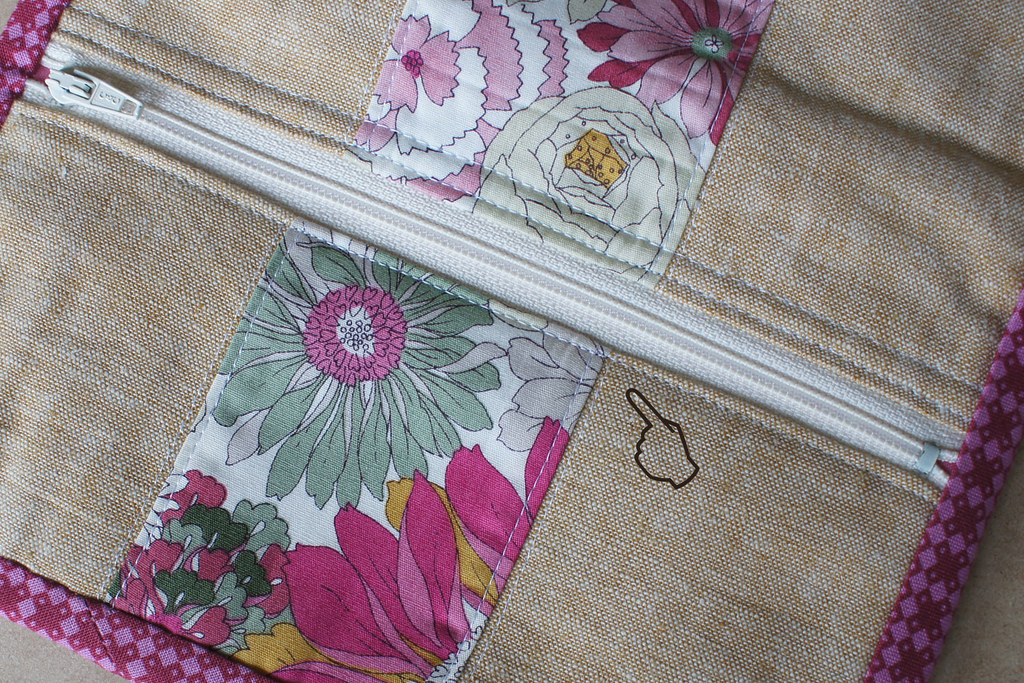
1. I added a line of stitching to the outer cover about an inch above the back zipper to section off the pocket, prior to sewing the main inside and outside pieces together. It's a preference thing-- but that way, the contents in that pocket will stay in the back and not work their way around to the front cover.
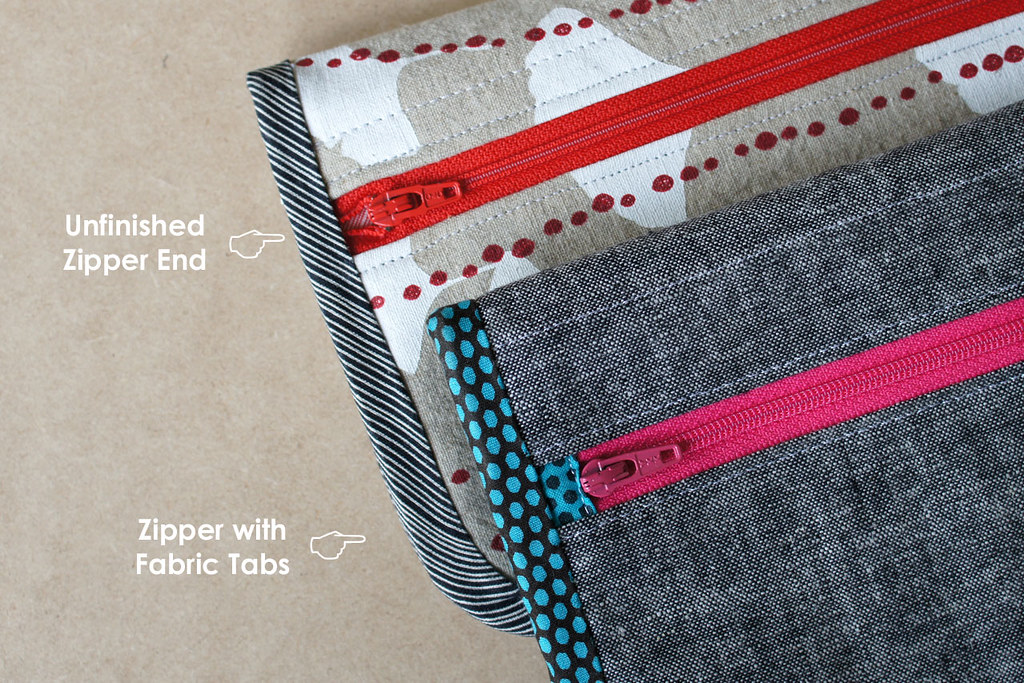
2. On my first two versions, the exposed ends of the back zipper bothered me. So for the final one, I ended up sewing a folded piece of fabric onto either zipper end to cover up the holes. It's an easy fix and makes the back look so much nicer.
Phew. Are you still here? If so, you have a chance to win a pack of awesome threads from Aurifil. I've been using Aurifil for all of my piecing for the last few months, and it's amazing. I've got 5 packs to give away. Just leave me a comment to enter! I'll close comments on Friday, June 8th and pick winners.
And if you are making the zip organizer this week, don't forget to post a photo of your finished project in the Flickr pool and link it up to Lindsey's blog, LR Stitched, for a chance to win an awesome prize from Lecien-- a huge bundle of Cosmo floss!
A big thanks to the Zakka Style Sew Along sponsors as well:


Now get sewing!
77 comments:
Your 3 organizers are a real inspiration. I can't wait to get started with mine!
Linda F
Great Tutorial!!
Thank you for tip on the zippers. I do not like them at all. I love the organizers. Beautiful details incorporated into the material. I look foward to making my organizer, I am in need of one. Thanks for sharing....Judith, Texa
I great tutorial and tips! I haven't decided to try it yet, but your tips will be very helpful if I do!
I had began sewing my version a couple days ago, and noticed that there had to be errors. On Lindsey's (lrstitched) blog she said there were a few printed errors darn! wish I would have seen them before because I had somewhat a hard time figuring the zipper out because it didn't say which direction :) I LOVE YOU VERSIONS!!! especially the one with the crafty fabric!
oh my gosh krista!!! these are totally wonderful. and the post is filled with so many great tips! I really want to make one now. :)
Thanks Krista! You have done amazing job with your zakka 'tutorial', so many useful tips and hints!!! And your organizers are all 'edible' beautiful ;o)
ooh, thanks for all of the tips. I have two children who have been eager for me to make some organizers for them, but after reading through the instructions, I knew that there were some things that were not quite clicking with me. and *I* have been eager to try out some Aurifil, so thanks, too, for the chance to win some of that!
Fabulous job with the write up and suggestions Krista. This pattern definitely calls for some tips. Yours are awesome!
oh my goodness - I'm pretty scared, but thankful I have your tips on top of the book...THANKS for your time and detail!
Great post with some really helpful tips!!!
I love these organizers!!!
Your fabrics are fantastic!!
this is a great little organizer....all the combinations look so pretty
You know, I have to say that I was not initially inspired by any of the Zakka Style projects. Until this sew-along, and especially now that I see this blog post. Thanks for sharing all your tips, and for the lovely Aurifil giveaway.
Thanks for the great review! I need to make a new wallet--spilled coffee on my current one--and this looks like a great pattern to use. I'm a little worried about the all around zipper, but you made it look do-able.
Thanks for the great tips! The fabrics you chose are awesome!
Thanks, you've done such a wonderful job with your instructions. I really appreciate you for the trouble you went to to include the details such as the little hands pointing to the pictures. Perfect!
Mary
Svalgoma@yahoo.com
Wow, do you have too many organizers now because I'd be happy to take one off your hands. Thanks for sharing your "lessons learned" with us too.
Super good instructions!! Thanks for the good tip on the interfacing type. I was wondering about that.
Yours looks just super great!
Wow, three great organizers - what a lot of work. Great tips - I also wanted a firm organizer so I used a mid-to-heavy interfacing and cut it so that it was 1/4" away from the edge to reduce bulk. It worked well. Your finishing touches make it look so neat.
This looks daunting, but I really want to give it a shot. Thanks so much for all the great tips!
That was a fabulous, thoughtful post Krista! I will return and re-read when I have time to make the organizer after our quilt show this weekend! (don't count me for the giveaway - lots of Aurifil here!).
Wow, your instructions are great and have stopped my poor heart from missing anymore beats from worry - I will be making a zippered organizer this week, thanks to your iinstructions!!! Oh and would LOVE to win some Aurifil!!!
Thanks for the tips! Yours looks lovely, all of them.
I LOVE your organizers!! I hope I can get brave enough to try one! Is it a nice size for a wallet? I'd love a bigger one to carry around.
All of your careful documentation of making these organizers is so helpful! I haven't been sewing along with the group, but now I really want to make this project! Thanks for sharing your tips. :)
Thank you for the pics and tips this project has been a bit of a challenge for me so maybe i will try it again
3rd times a charm right? Lol
marymoondesigns@yahoo.com
Wow your organisers look great! I'm a bit frightened of it now!
I really love the fabric you used in version two!
Your organizers are gorgeous! :)
Thanks for all the tips. Your organizers are gorgeous.
Love your fabric choices and zip pouches!! I might have to try this.
This is going to be sooooo helpful! I appreciate your insights, especially about the interfacing. Great job - nice to see that all of them are beautiful, even with different approaches.
Wow, those do look lovely! I'm definitely going to be trying this one. :)
Ha! thanks for explaining the zipper...I couldn't figure that part out.
Thanks for the giveaway!
Thanks so much for the great tips and great photos! It really helps. Your organizers are awesome.
Barbara carter
wow - fabulous tutorial and looks like I'll need it to get through this project - thanks for the great tips too :)
holy amazing detailed photos and descriptions, batman!! what a great collection you've made - they look so completely professional and awesome! thanks for the great tips!
Oh, you make it seem so easy! And terribly cute, too.
Thanks so much for the tips on this project - you've clarified a few things I was not sure on. I really wanted to make this one and I'm glad to know it will work out if I go for it!
Thanks for your detailed explanation! Now I feel ready to tackle this project!
You have done amazing job, Krista! The datails and tips are wonderful. And the pictures... You made the instruction so much easier to follow. I know more people will try the project when they see this post. Thank you!
Wow, you made three! Great job! I love the little tab you added to your zipper ... I'm sure I'll have to copy you now. ;)
thanks for the great tips, ESP the one about adding the zipper tabs. I wish I read this earlier today, I just put a flush zip pocket on the front of a summer bag I'm making... the tabs would have made it neater!
These turned out great! I really love the details - fabulous.
I just finished up a huge project for a client, and decided to do something fun for me today! I think I'll make one of these!
That was such a fantastic tutorial . Thank you for going to so much effort! I love all three of your organizers , but especially love the Ink and Spindle Gingko fabric !
Thanks for the tips! Your organizers are all quite beautiful.
Wow after reading this I think I may be brave enough to give it a go! thanks for all the tips!
What a great review! I love that you shared some of your "mistakes" - even the mistakes look great, but it's great to learn your tips and tricks. I've been struggling with connecting continuous bias so I really appreciate your clear photos on that! Amanda, aberka AT gmail DOT com
Thank you! I love the fabric you've used for all of them. Thanks for the tips and tutorials, too.
Now Krista I have to thank you for sharing all those great tips because I am a visual learner and have struggled with some of the Zakka projects already. Your 3 different versions and experience will definitely help a lot of us. The zip organiser looks less intimidating now.
Thank you!!! This is so helpful. Now I finally trust myself to start (o:
Cute fabrics, wonderful construction, lovely stitching. I don't think I'll be making one anytime soon, but boy, I sure covet yours! No need to enter me for the give away.
Great tutorial Krista and I love your versions of the zip organizer!
Im working on my organizer (or should be instead of leaving comments!). Love your fabric choice!
Hi,
A fabulous cluth all three look stunning. Oh! my god I have to make one.
You did such a great job with this, Krista! I really want to make one and will bookmark this for someday.
Wow! You did such a clear, thorough job of explaining the tricky bits of this project, I feel confident enough to tackle it! Your photos are beautifully done and very helpful.
Thank you!
Thanks for the great tips and tutorial! I am so keen to try using Aurifil thread which seems impossible to buy here in Australia, so thanks for the opportunity to win some,
Cheers from Helen
Wow, thanks Krista! I love that you explained your interfacing choices, that is an area I always get hung up on!
This looks scary and awesome at the same time. I would love to make these for christmas presents!
This looks scary and awesome at the same time. I would love to make these for christmas presents!
Awesome job, I've been eyeing this pattern and am waiting for the book from the library and your tips here will definitely help me and only freaked me out a little bit! Haha!
I really appreciate the tips on the facing and working the zipper.
Your post is great - lots of useful details and tips, and beautiful examples to inspire.
I am just hand stitching the binding on and then I am done. Especially the binding had me growling a few times as I had to unpick it several times (as the zip and binding are all so close to the edge the stitching I had used to attach the zip kept poking out from under the edge of the binding which also seemed much too wide so I have double bound it. Wish I had followed your advice about the interfacing but I didn't have any sturdier one and I was desperate to start. It Looks fab and I will make some more soon! Thanks so much for your tips and encouragement!
I am just hand stitching the binding on and then I am done. Especially the binding had me growling a few times as I had to unpick it several times (as the zip and binding are all so close to the edge the stitching I had used to attach the zip kept poking out from under the edge of the binding which also seemed much too wide so I have double bound it. Wish I had followed your advice about the interfacing but I didn't have any sturdier one and I was desperate to start. It Looks fab and I will make some more soon! Thanks so much for your tips and encouragement!
For some reason I didn't finish reading this before making my own zip organizer, but I'm definitely going to keep all this in mind when I made my next one. Great tips!
Quick question - did your exterior panel end up big enough after sewing in your zipper? Mine was too small, so I think next time I'll just make the exterior panel bigger to start & cut it down to size after I put in the zipper.
I love your organizers! great tips!
Krista,thanks for sharing, therefore, not yet received my magazines Zakka.
Thank you so much for the tips! I attempted this organizer when I first bought the book (on its pub date) and the errata had not yet been posted, so I ended up with an woefully unfinished organizer that has been gathering dust on a sewing shelf. This helps so much!
I am a little late commenting but just now saw this. Great little tute you did. Gave me a neat idea I am going to try by sewing one of these. Now I either have to get the book or try to pattern it myself. NOT, LOL... the book it is. Thanks for the great tutorial!
the one with all the japanese fabric is so amazing! i was already planning on making this, but now i want to make one EXACTLY like that one! thanks for all the tips.
Lovely!
These are just gorgeous. I envy your talent.
Thanks for the tutorial! I am going to try to tackle this soon. One question: do you cut off the zipper tail end after you stitch the first half of the binding? I don't see that part mentioned in the book.
golden goose shoes
jordan retro
supreme t shirt
yeezy boost 500
off white
golden goose
curry 6
yeezy 700
kd shoes
supreme clothing
Post a Comment